Title here
Summary here
From time immemorial, guitarists have employed the technique of “move a finger, see what happens.” Doing this anywhere on the guitar can yield interesting results. It’s particularly powerful with the open position chords. They seem to lend themselves to this technique, adding even more open strings to resonate. While experimentation is good, taking a systematic approach to cowboy chord derivations yields great results. It’s useful to understand how you are altering the chord so that you have the theoretical underpinning of why it sounds the way it does. That way, you know the altered chord as opposed to just stumbling into it.
Practice
Live these voicings for awhile. For awhile, don’t let yourself play the stock open position fingerings, but instead make yourself play 2nds, 6ths, 9ths, 4ths. Use apreggios, strum, fingerpick, whatever style you want.
Let’s do this exercise with the six main open position chord shapes: C, G, F, D, A, and E.
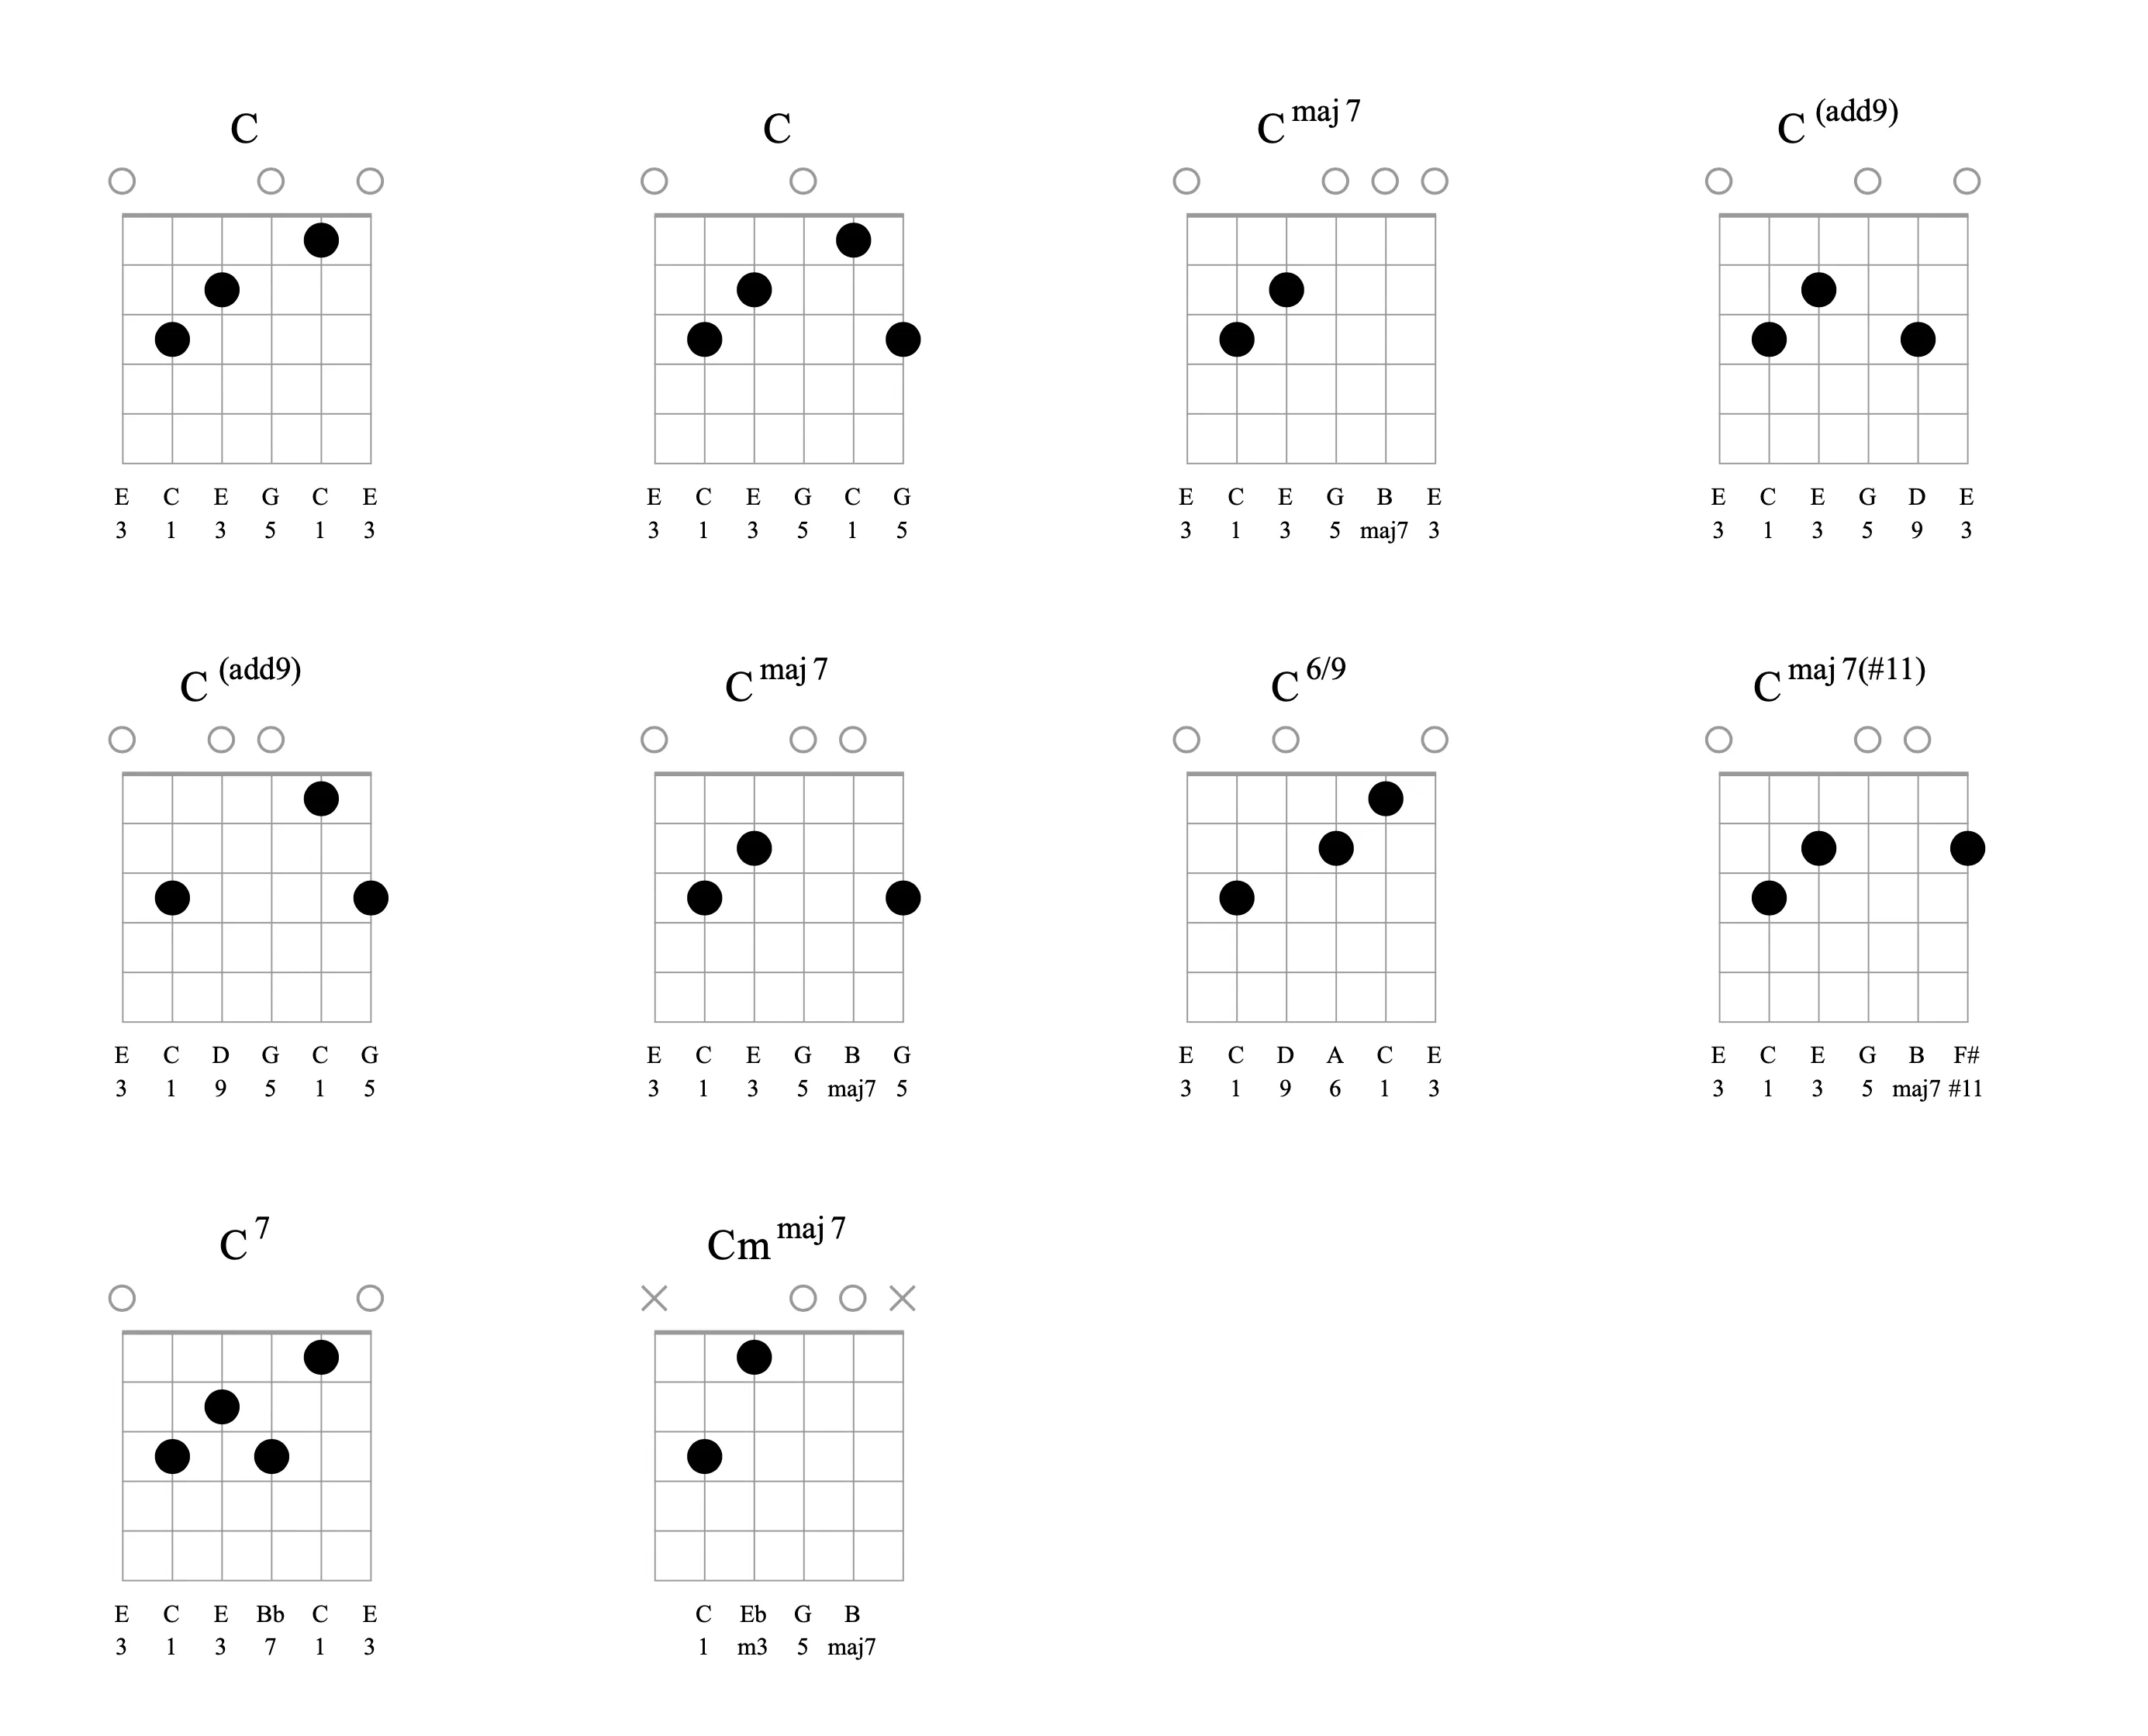
The C shape affords tons of possibilities for beautiful-sounding augmentations, because of the simplicity of removing your index finger and middle finger to open up the D and/or B string, and the freedom of your pinky to add notes. See the chart below:
A lot to explore here — a bunch of beautiful-sounding chords that are all extremely easy to play and sound lush. Most of these chords are trickier when played higher up the neck, but in open position, they’re handed to you practically for free!
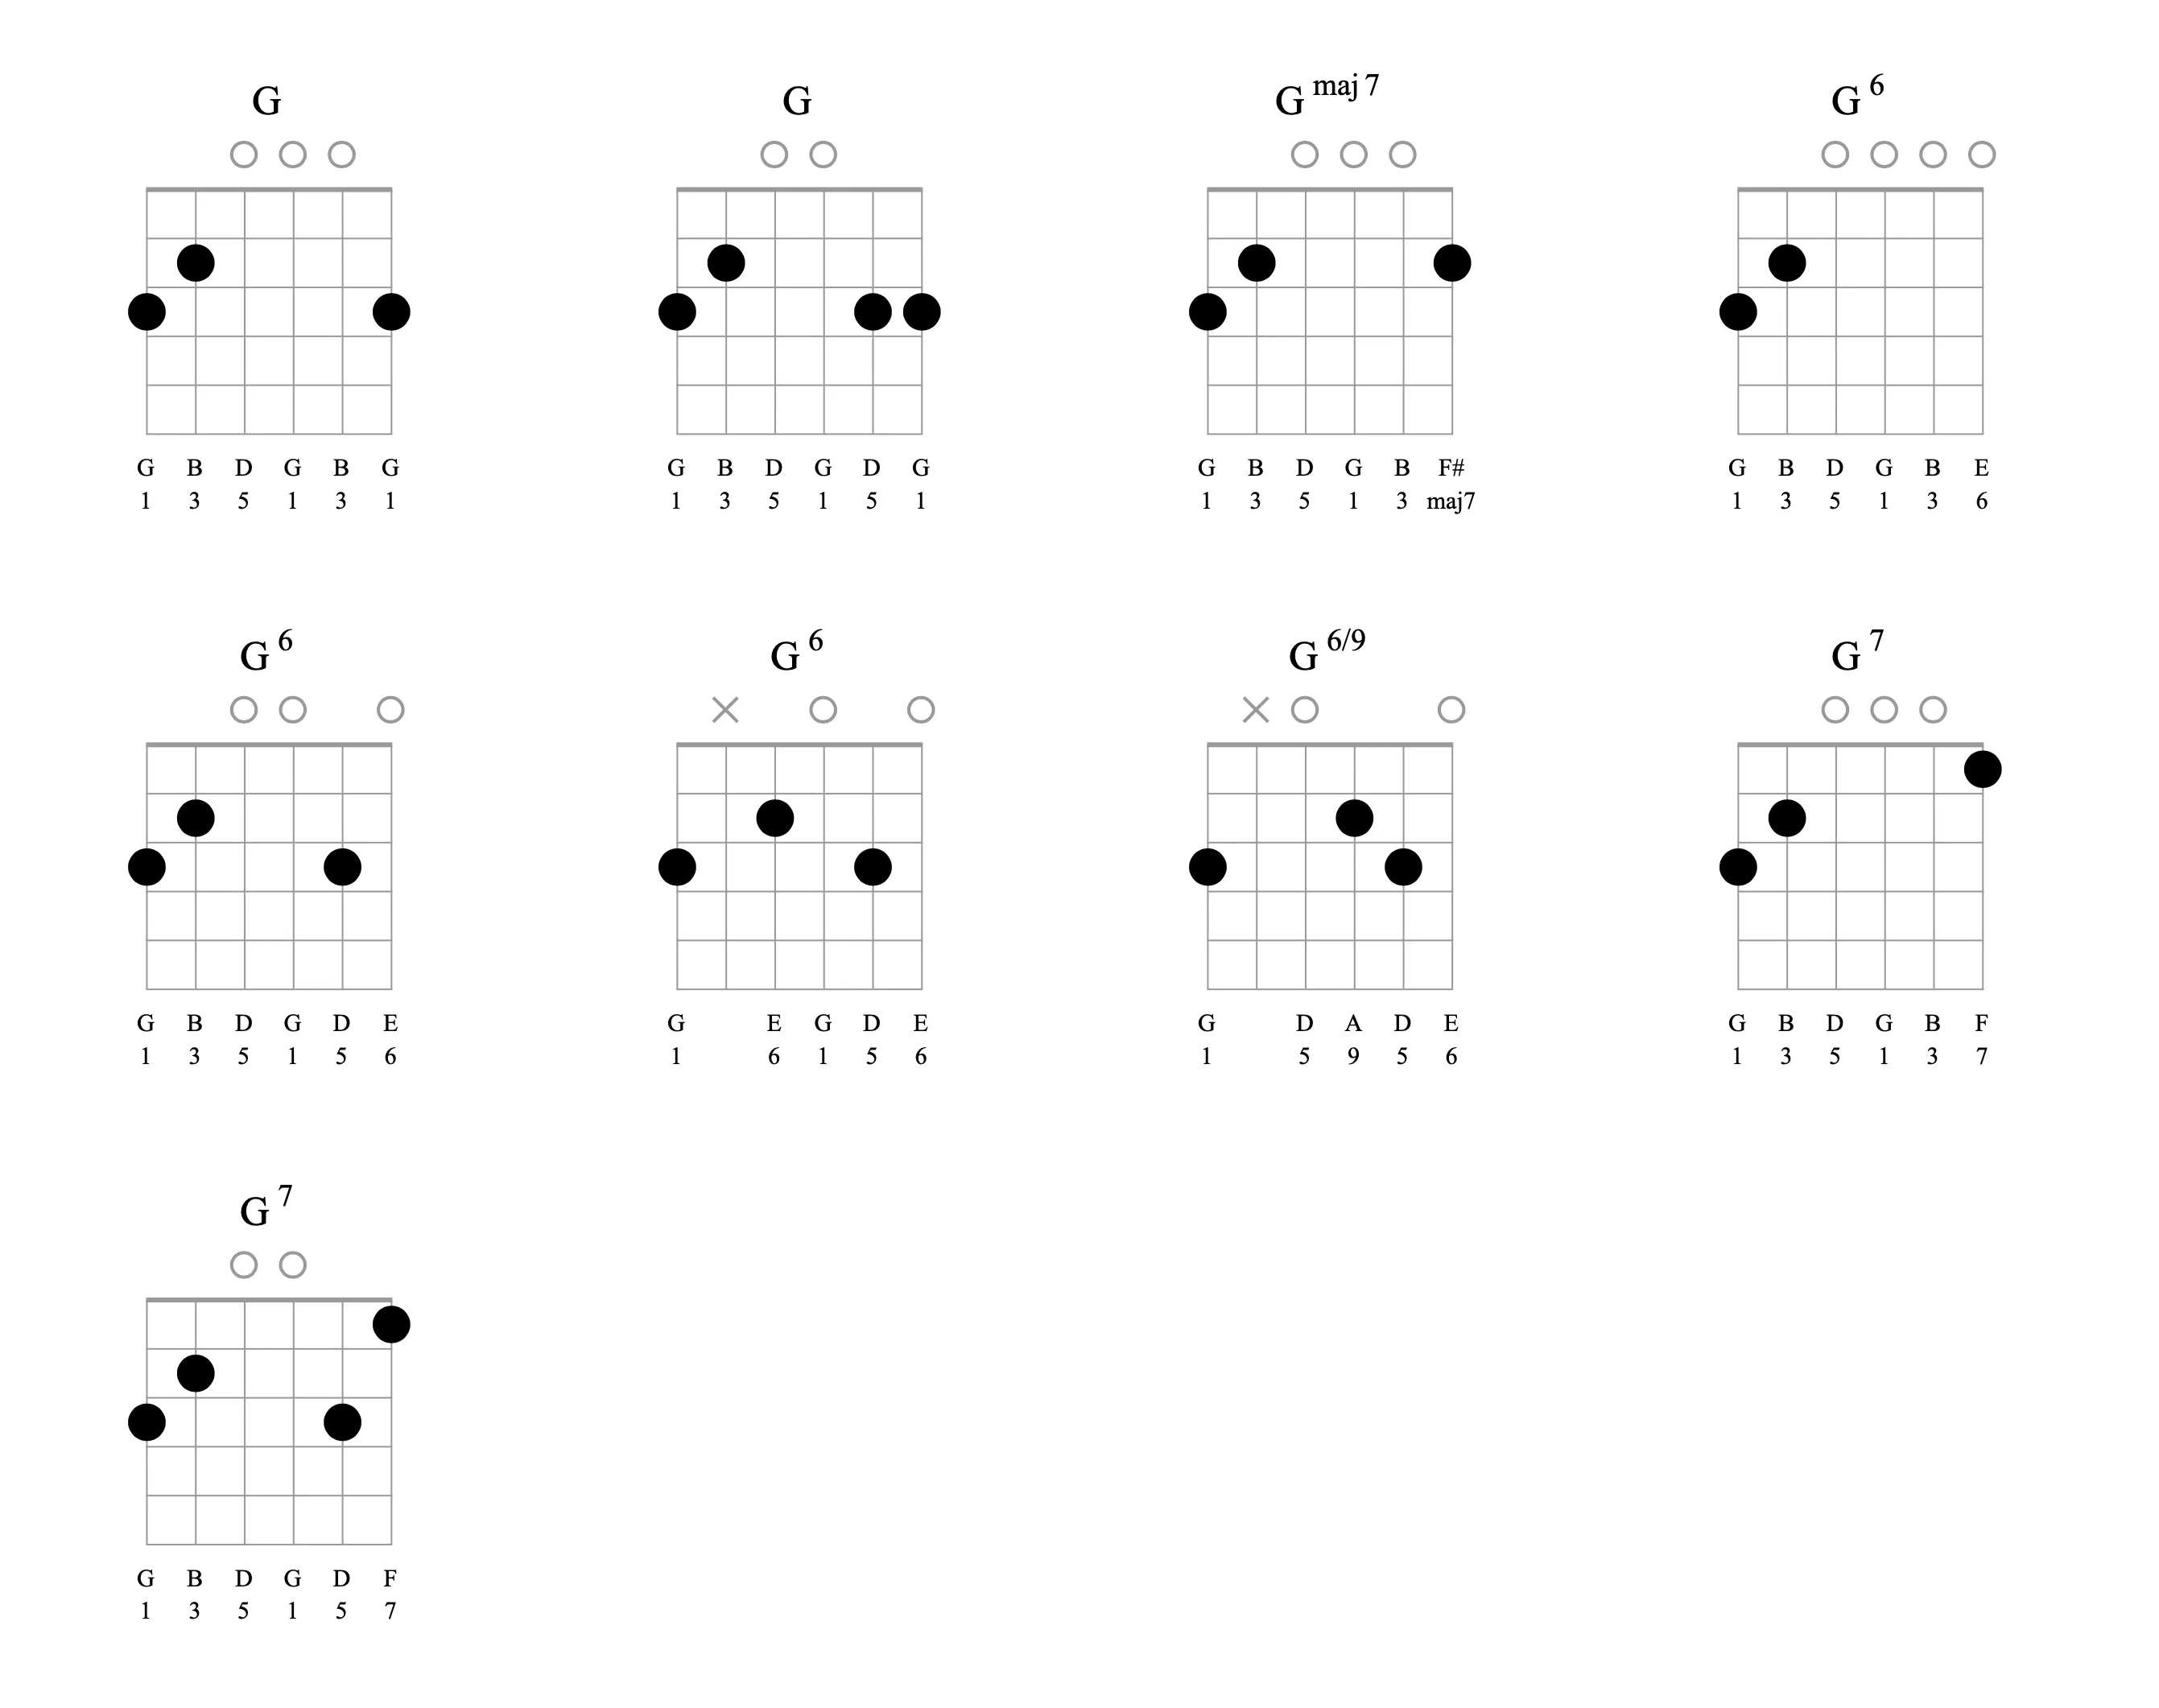
Like the C shape, you can get a lot of mileage by removing your pinky to make the high E string ring (adding the 6th), moving your pinky on the D string (adding another 5th), and moving your middle finger to the G string (adding the 2nd).
Some people like to play the G cowboy chord with four fingers, putting the pinky on the E string and the ring finger on the D string. This is a very full-sounding, great chord and you definitely need it in your arsenal. While it isn’t as useful for augmentations because you’re using all four fingers, it is perfect in two scenarios. First, when you’re playing in the key of D: going from a D cowboy shape to this shape means you don’t have to move your ring finger. Same with moving to an A chord — your ring finger can simply slide from the D to the C#. If you’re playing a folk song in the key of D, you’re probably going to want the four-fingered G shape. Second, when playing in the key of G: while you lose the alterations, you can leave your pinky and ring finger in place and simply shift your middle and index fingers up a string to voice a Cadd9 shape. And you have the same trick of getting to a D chord, where your ring finger can just stay in place.
There are two G7s that lay out nicely. Most people probably use the 3-finger voicing and let the B string ring. But you can easily put your pinky on the B string, which adds a D to the chord, softening the tension a bit when resolving back to C. It’s all about the feel. Play the two and compare for yourself. Which do you like better? To my ear, going from D down to C as a whole step and F to E as a half step has a more logical, graceful flow than having the contrary motion of B up to C as a half step and F to E as a half step. It’s less harsh.
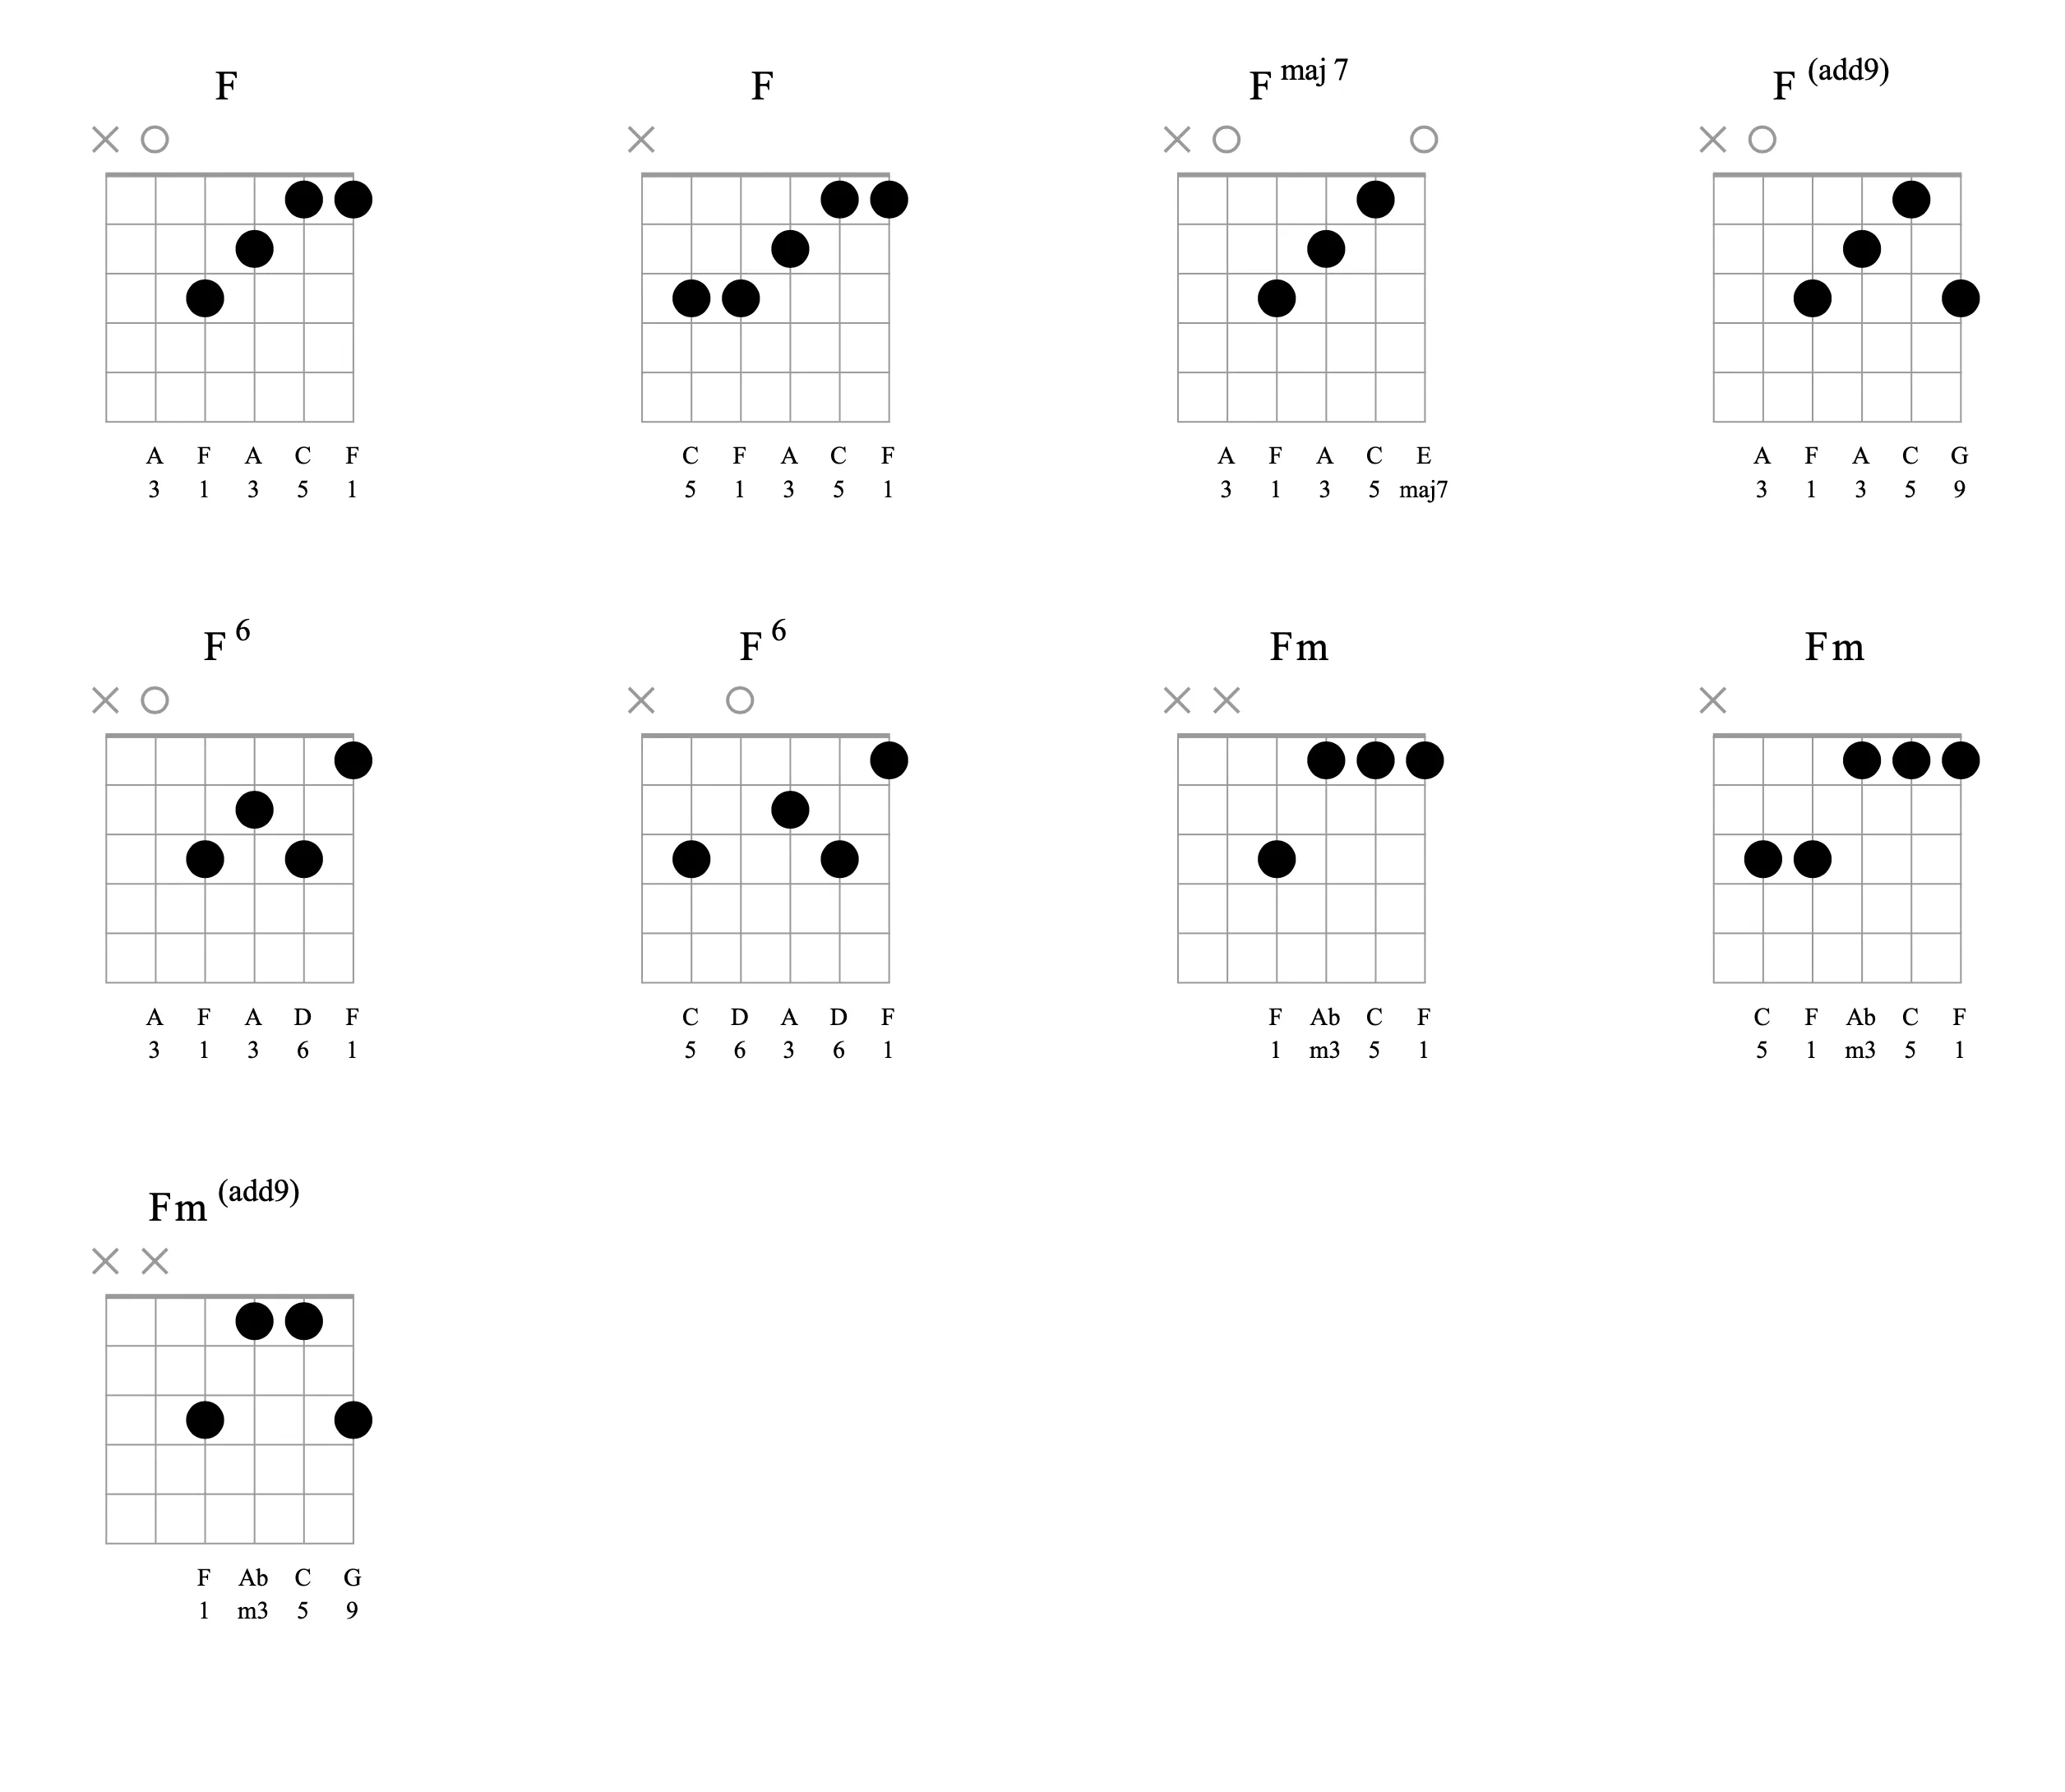
But before getting into them, it’s worth discussing the base shape. You can get away with just holding down the top four strings, which puts an A in the bass (the 3rd of F). But if you hit the low E string, you are in trouble. So, as discussed in the previous chapter, there is an option to hook your thumb to pick up the low F. Also consider grabbing the C on the fifth string. This turns out to be a super useful shape that can be moved all over the fretboard.
Like the C and G cowboy augmentations, you can get a lot of mileage in the F augmentations by removing your finger from the nigh E string (which makes a major 7th) and putting your pinky on the B string (adding the 6th).
For F minor, make sure you mute the 5th string (A), otherwise you’ll be playing a major third over the minor third, which will sound terrible.
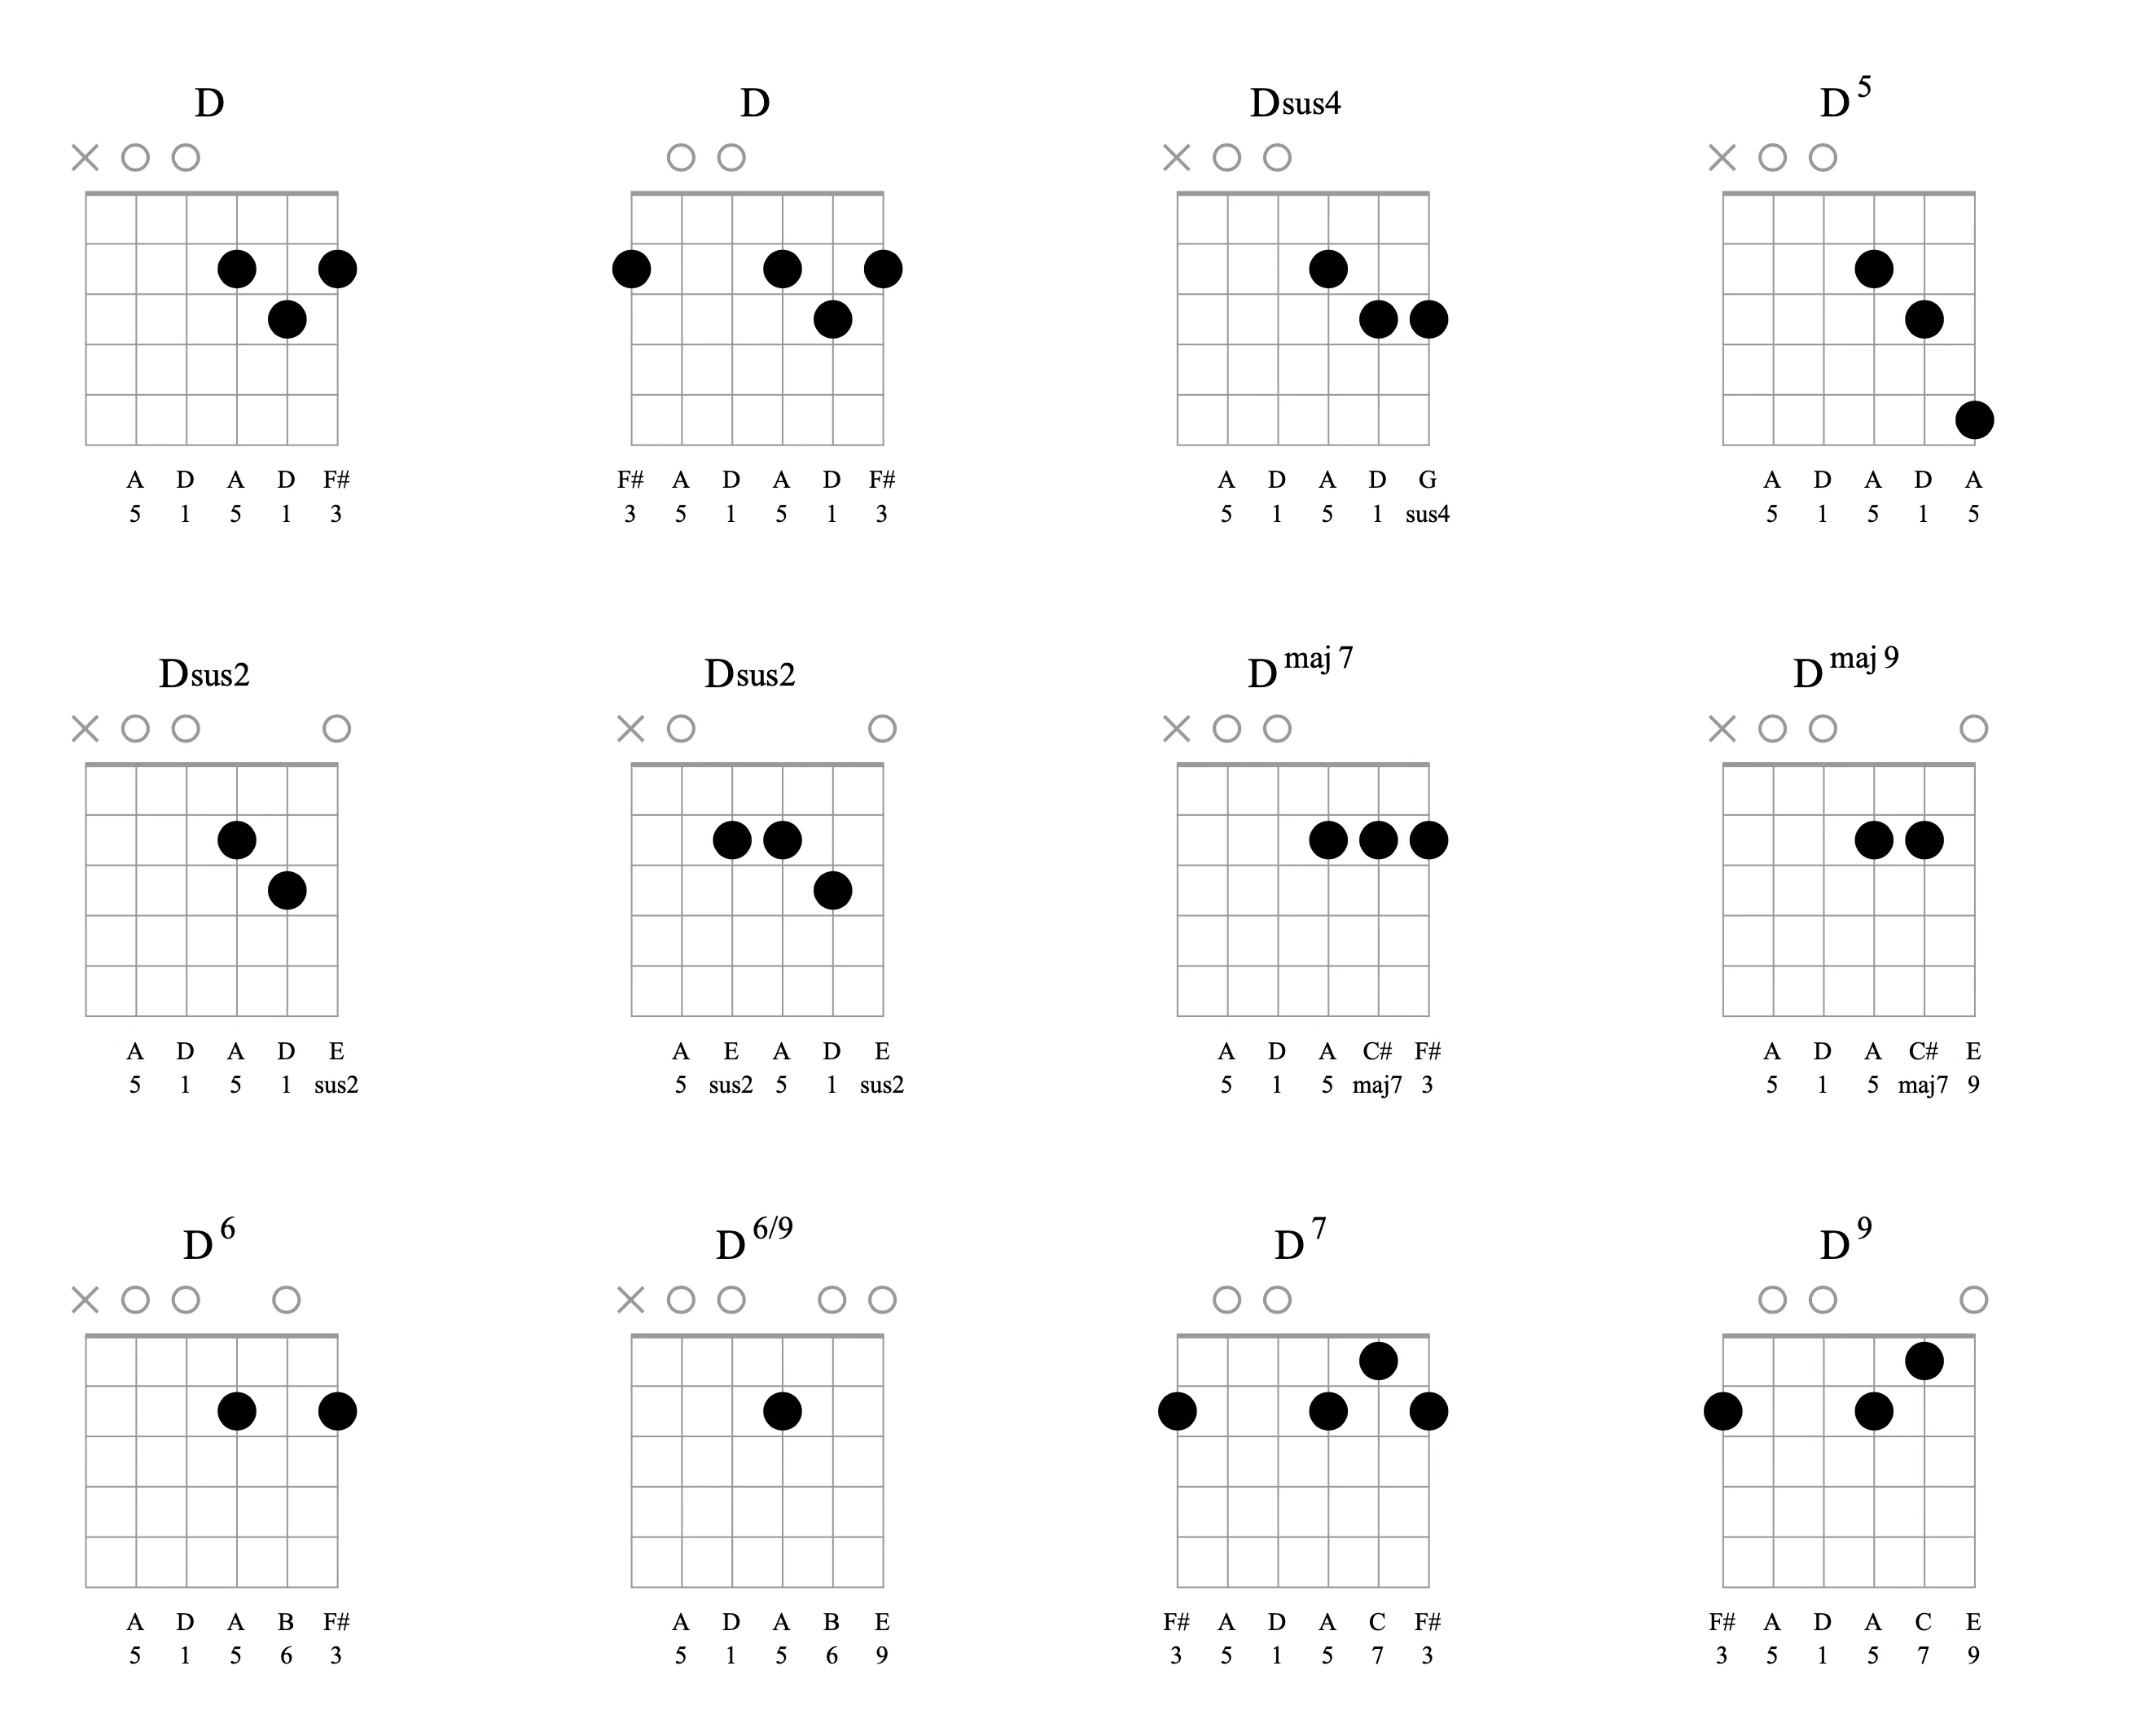
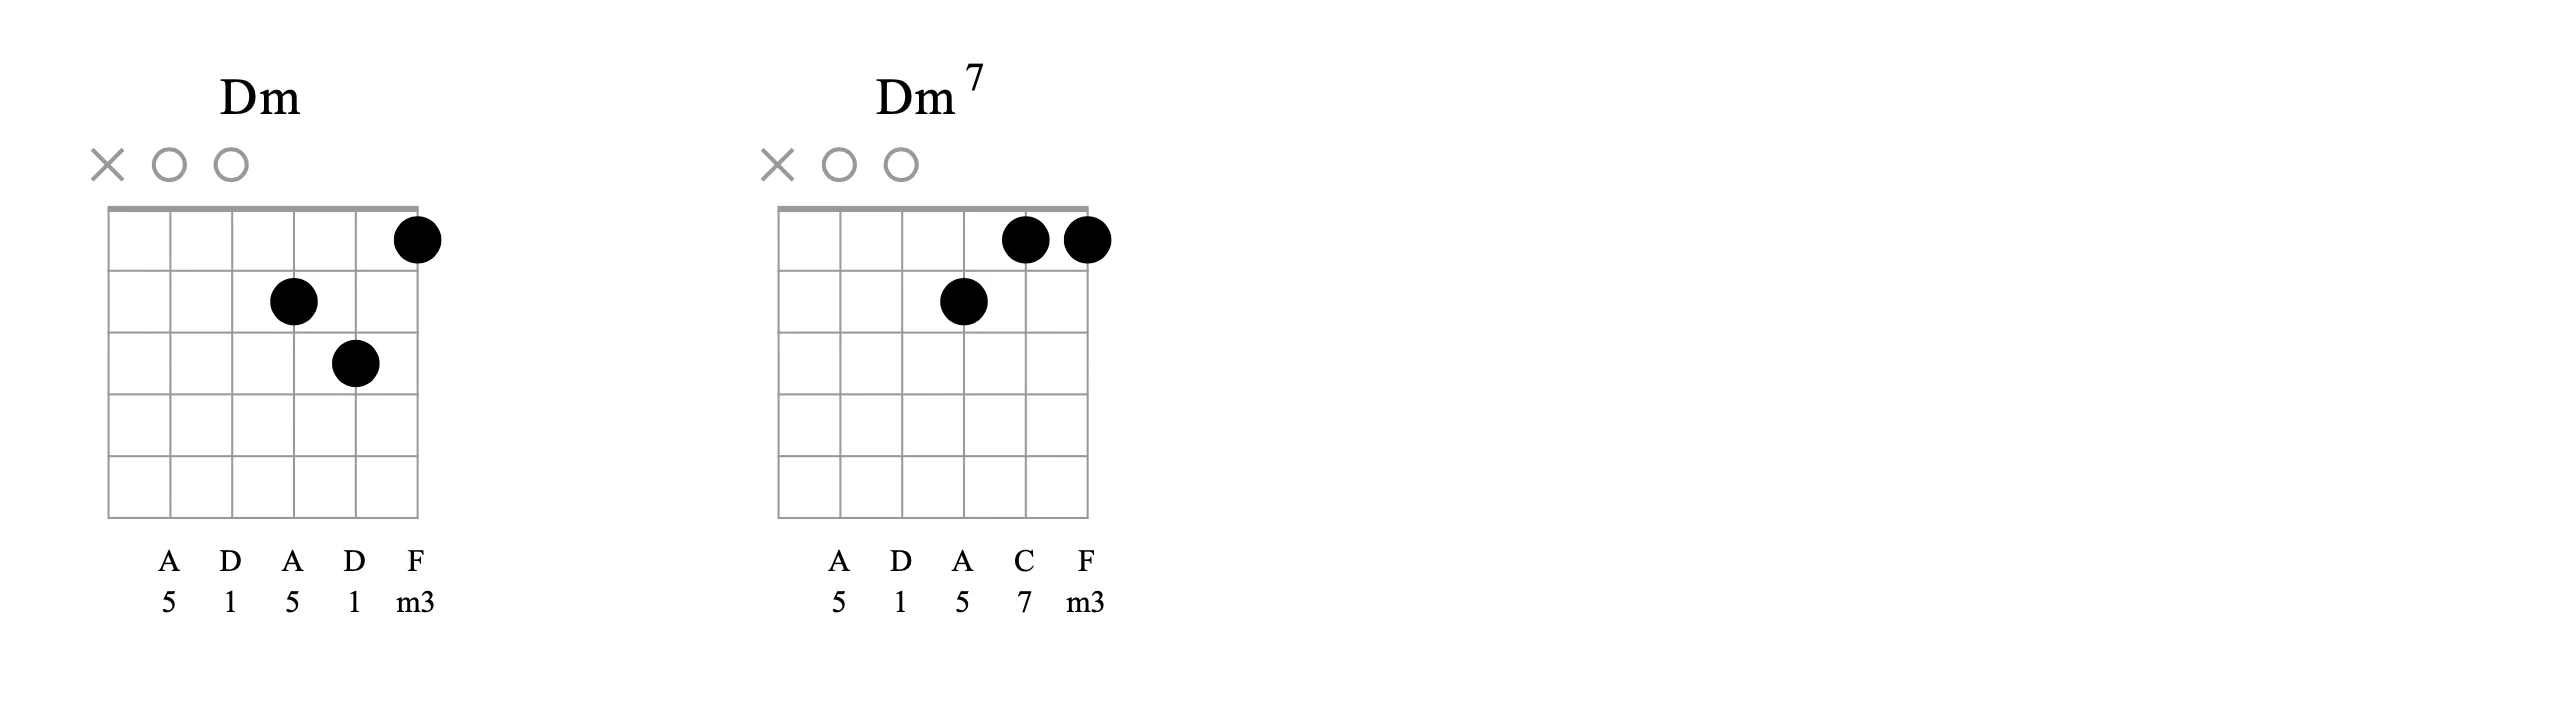
Some players hook their thumb over the 2nd fret of the low E string to add a third in the bass. It’s a good trick to know.
Lots of mileage to be gained by playing with adding and removing notes on the high E string: you easily get Dadd2, Dsus4, and D5 with the pinky on the top string — as countless singer/songwriters have discovered.
It’s also easy to make a Dmaj7 chord simply by moving the note on the B string a half step to C#. Let the high E string ring and you get Dmaj9. Or get a D6 by letting the B string ring but putting your pinky back on the F#. Or play the ultimate one-finger chord and get a D6/9 by only holding down the G string, playing an A.
D7 is super easy to play and get some color out of — remove your pinky and you get a ninth chord!
D minor lays out well, as do some easy augmentations. Play the C on the B string and you have an easy Dm7 chord.
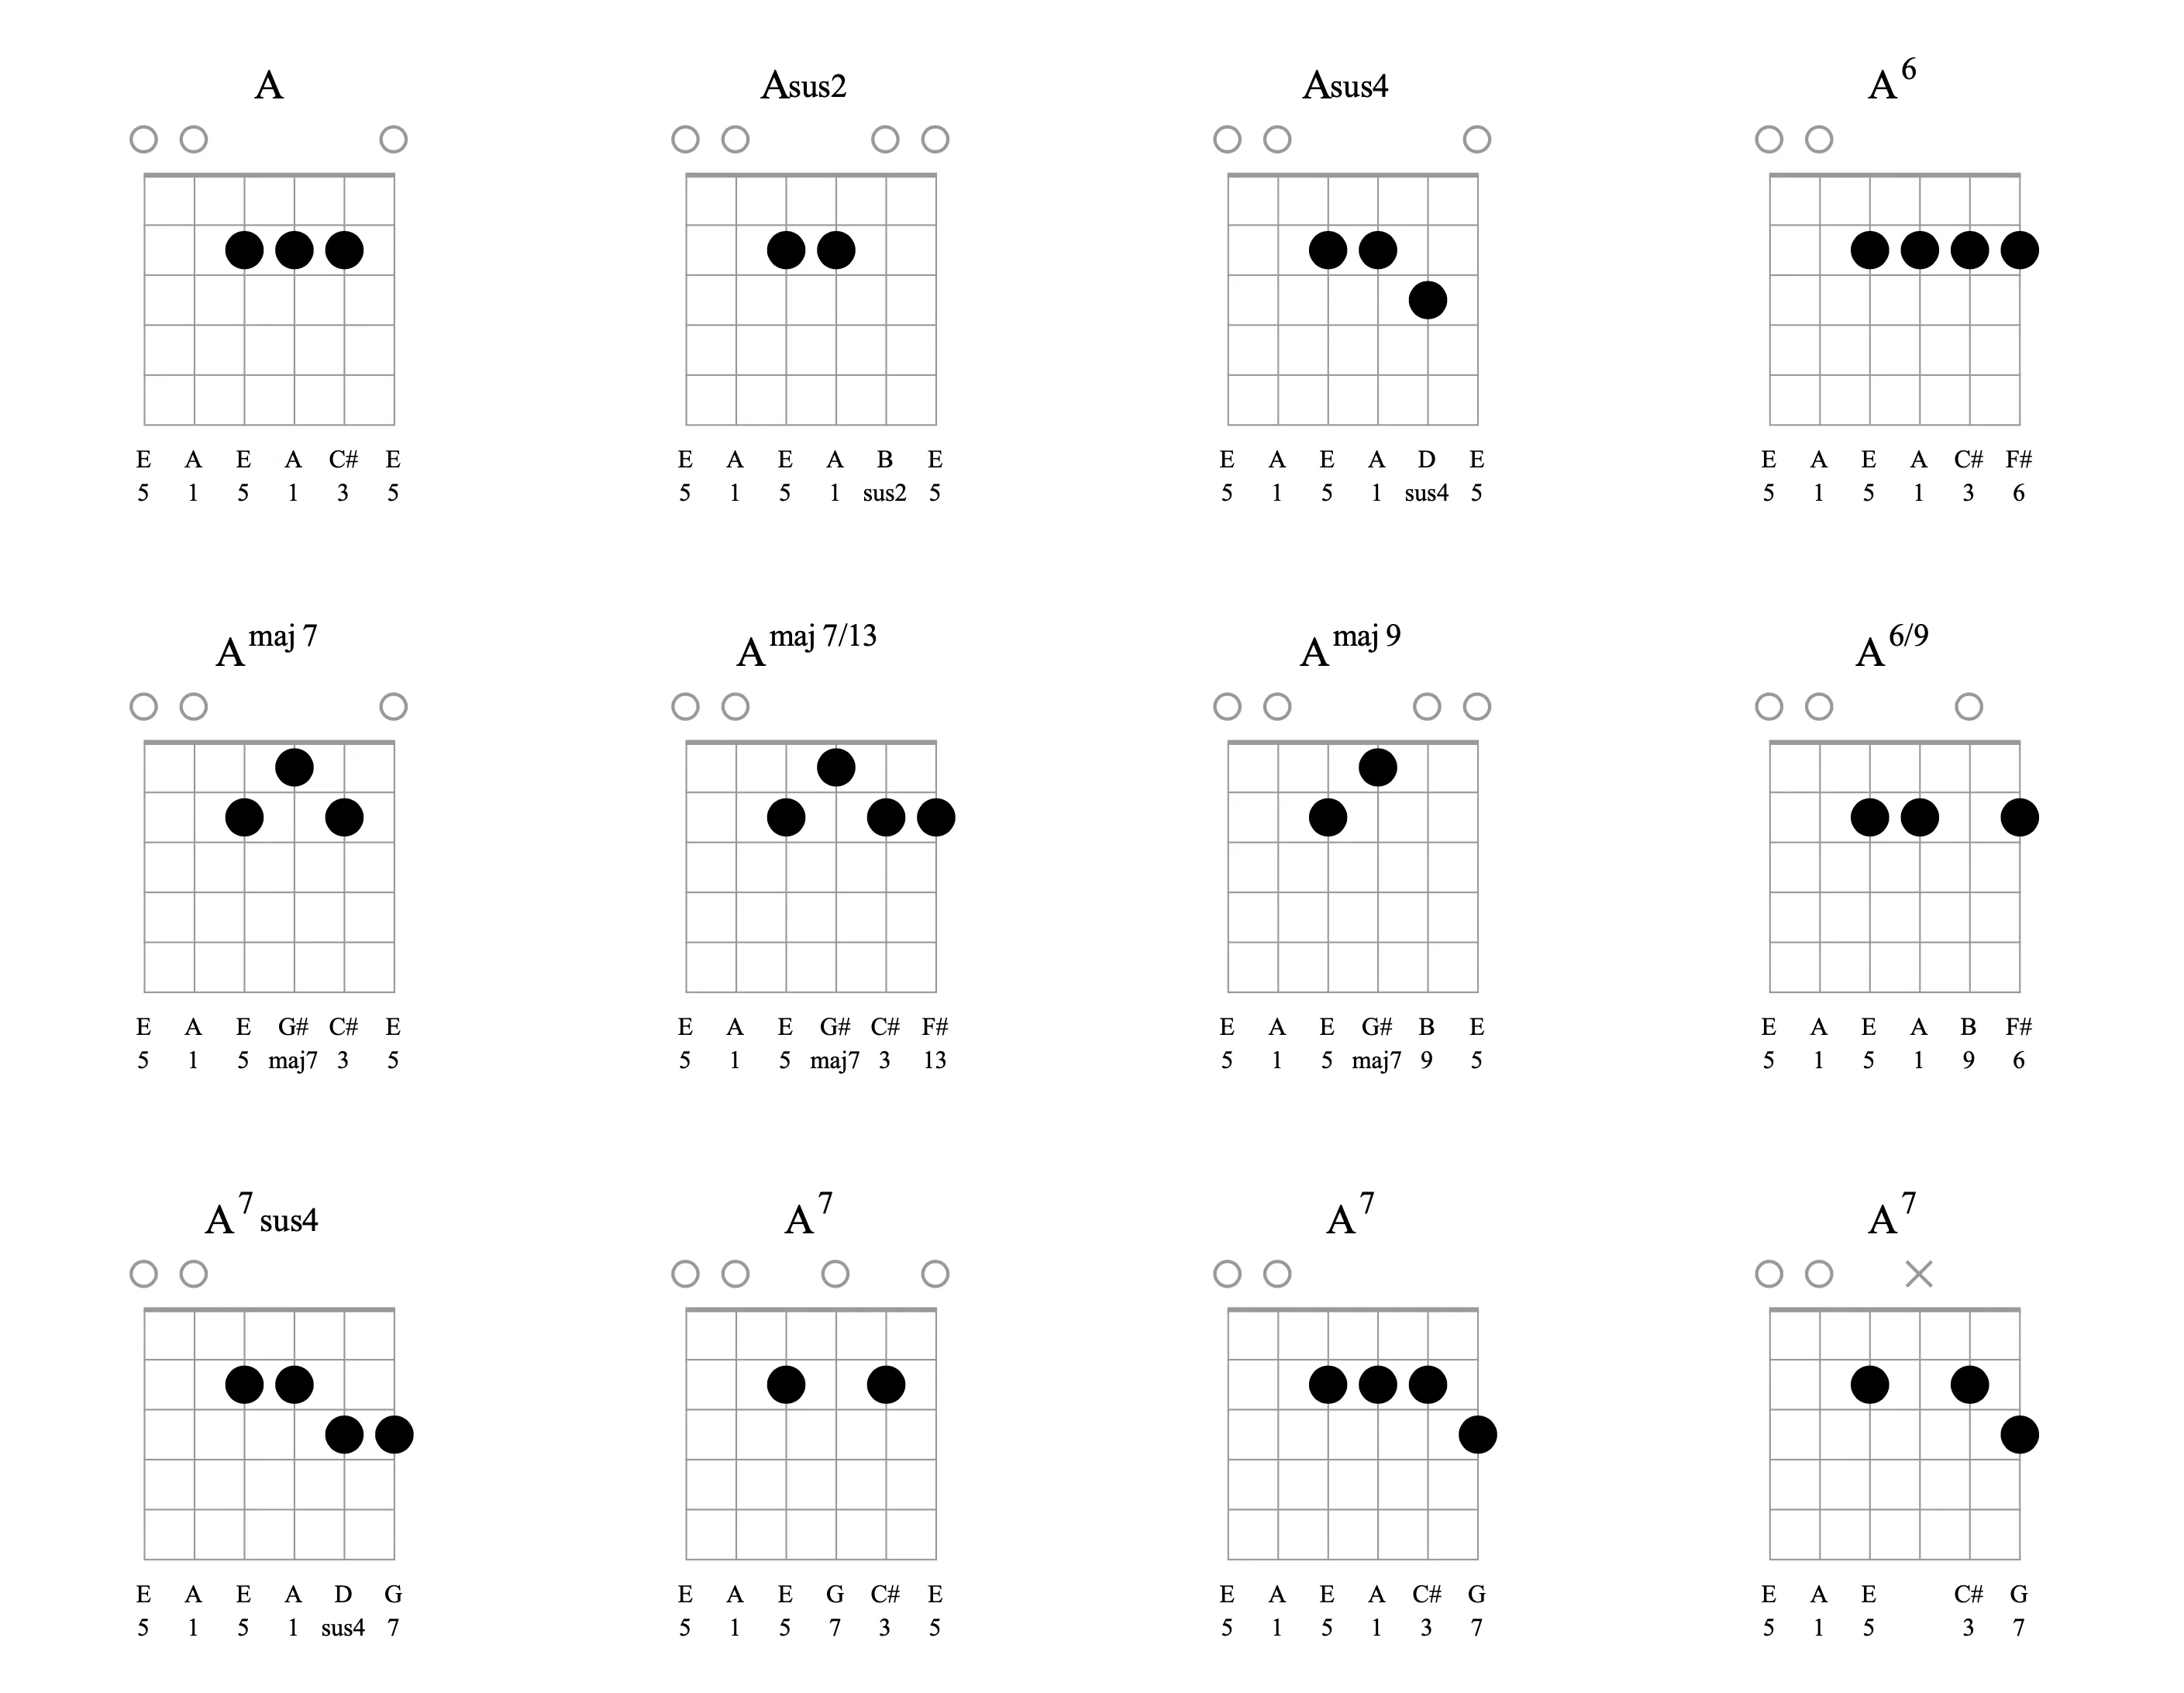
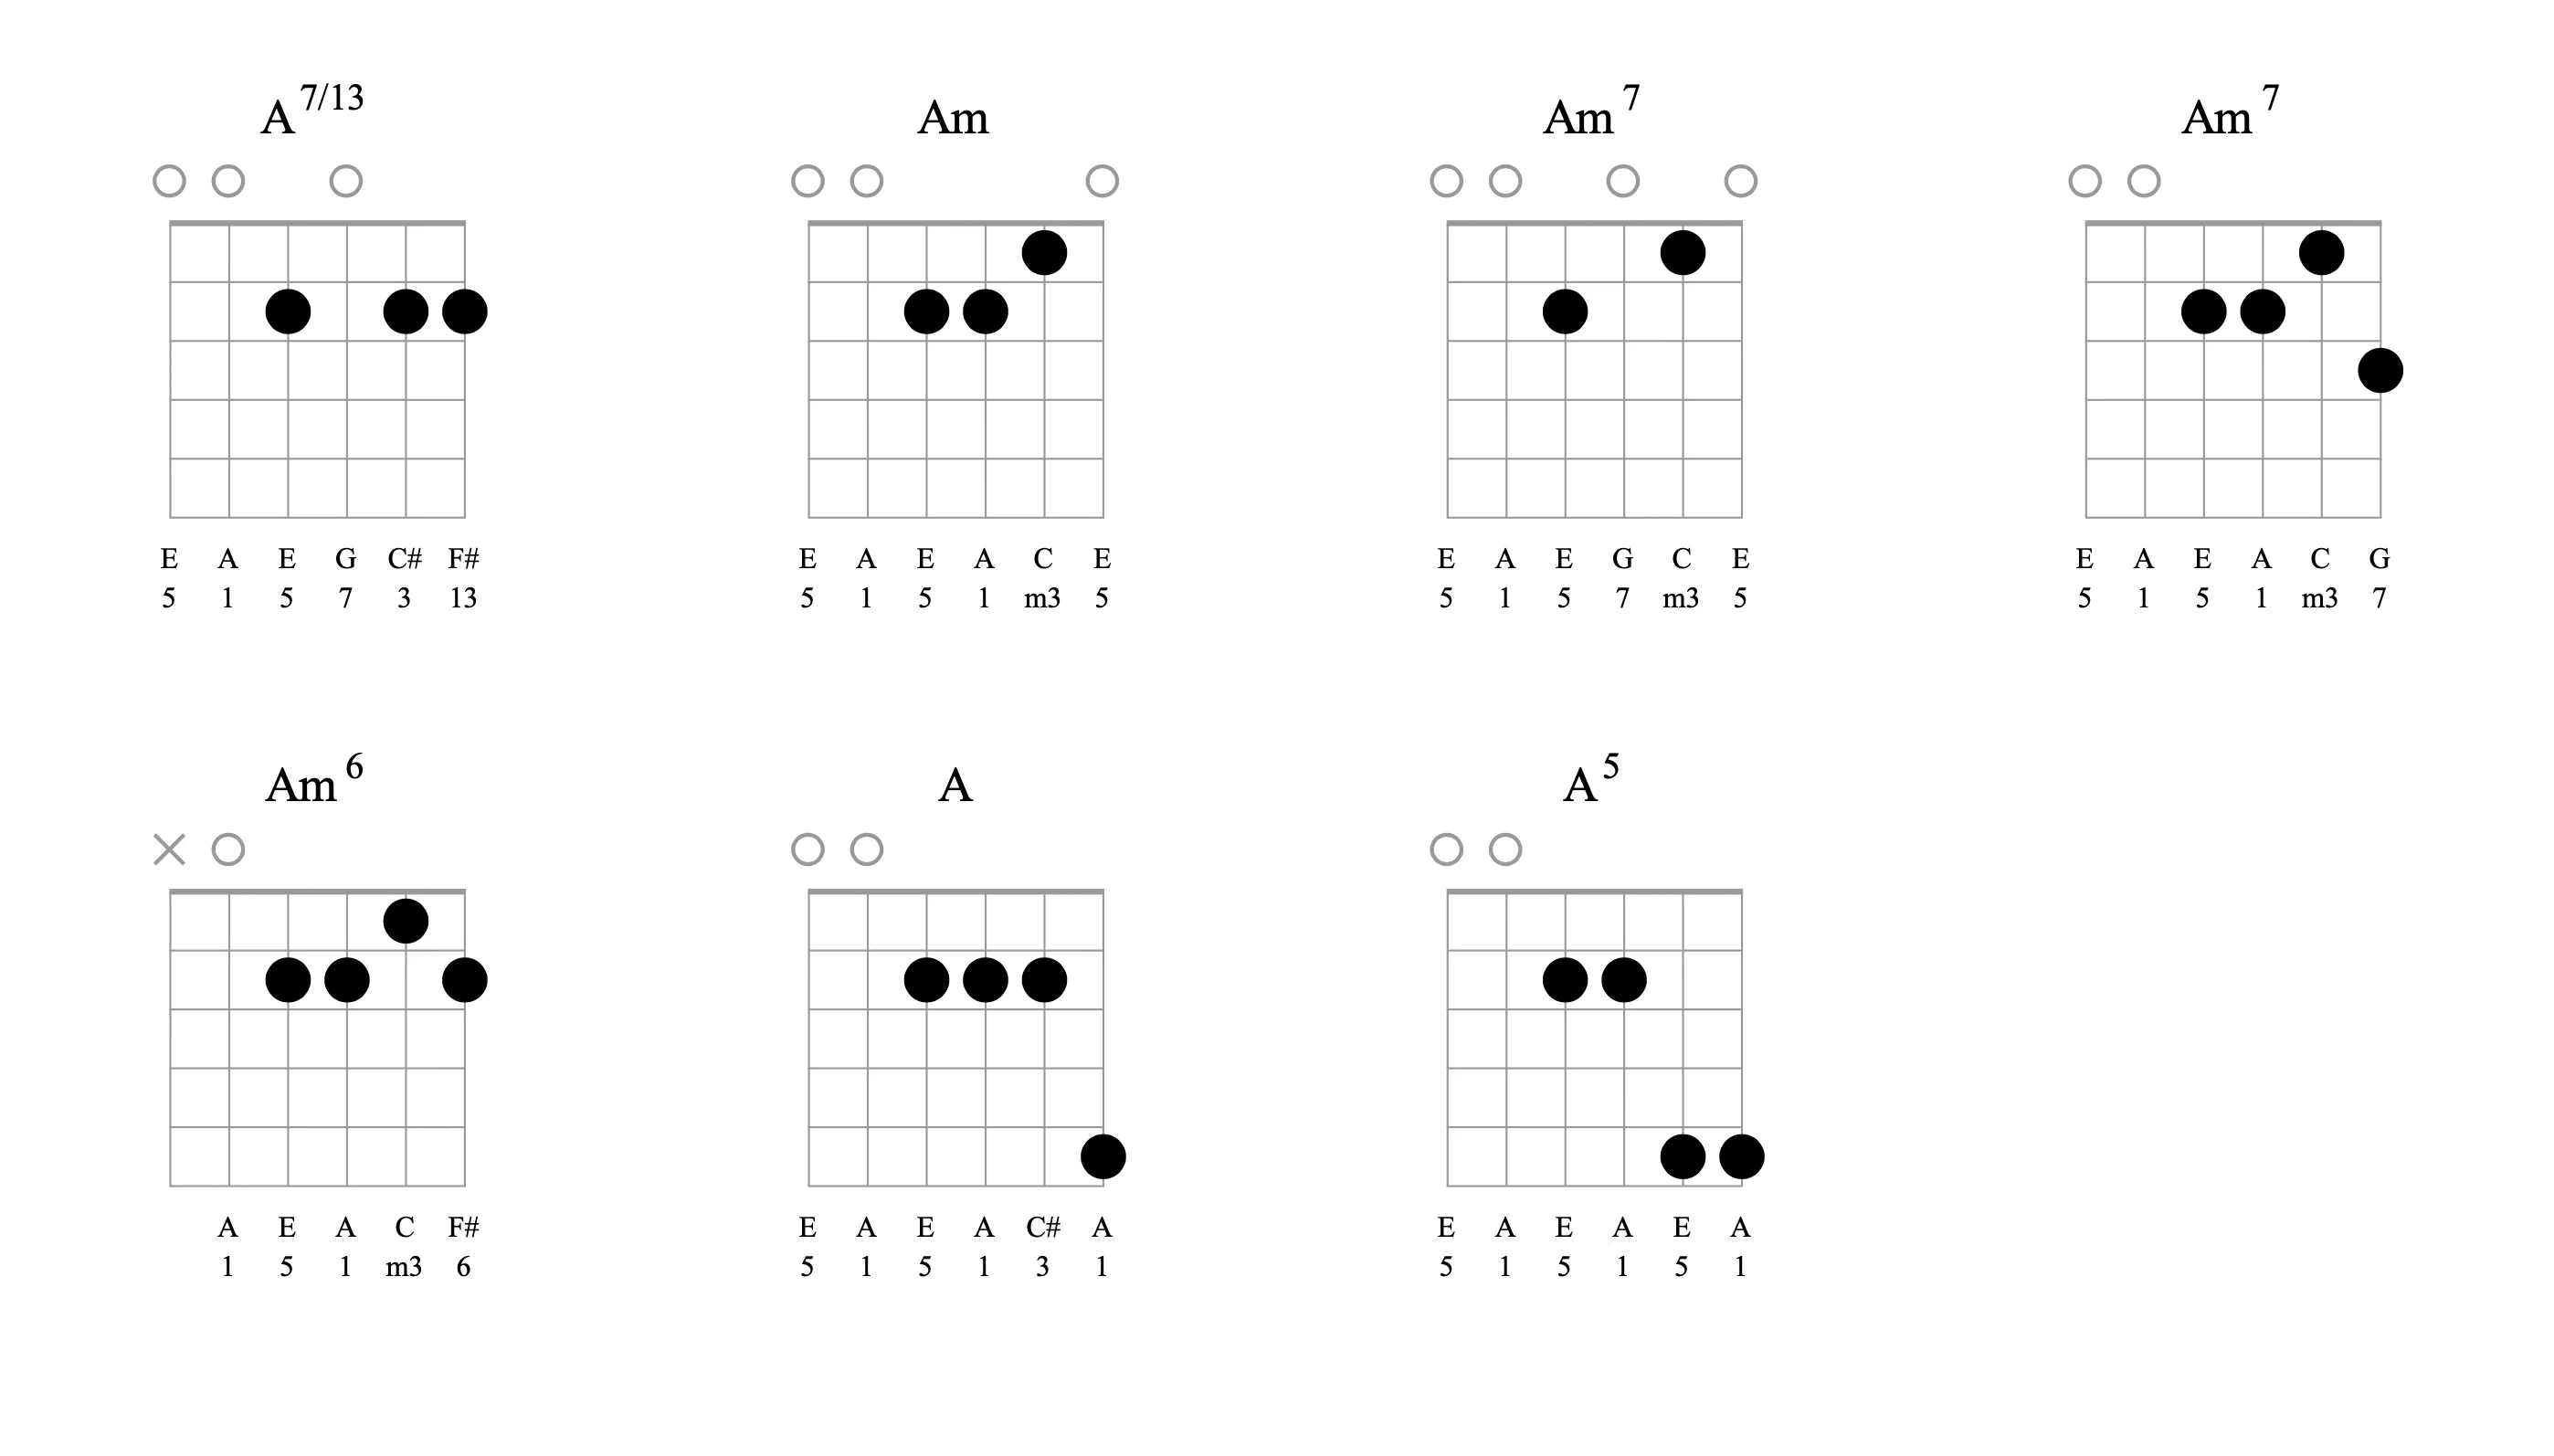
There are a few different ways to finger the basic A major chord. My suggestion: place your middle finger on the D string, your index finger on the G string, and your ring finger on the B string. This fingering provides the most economy of movement when moving to the D shape and to the E shape, because the only finger that has to change strings is your middle finger. Your ring and index fingers stay anchored on the same strings. This fingering also affords the simplest way to create augmentations by shifting a finger. If you bar the shape, you lose both advantages. The only compelling reason to bar is if you want to double the octave of the A and/or E with your pinkie.
If you stick with the recommended fingering, so many possibilities open up. Move your ring finger to make Asus2 or Asus4. Move your index finger to make Amaj7 or A7. Add your pinky and make A6 or A7. There are so many combinations that I’m not going to list them all — see the chart. There’s a reason why guitar players love A. We’ll see more of the beauty of the key of A in the arrangements section, but for now, remember how amazing open position a chords are
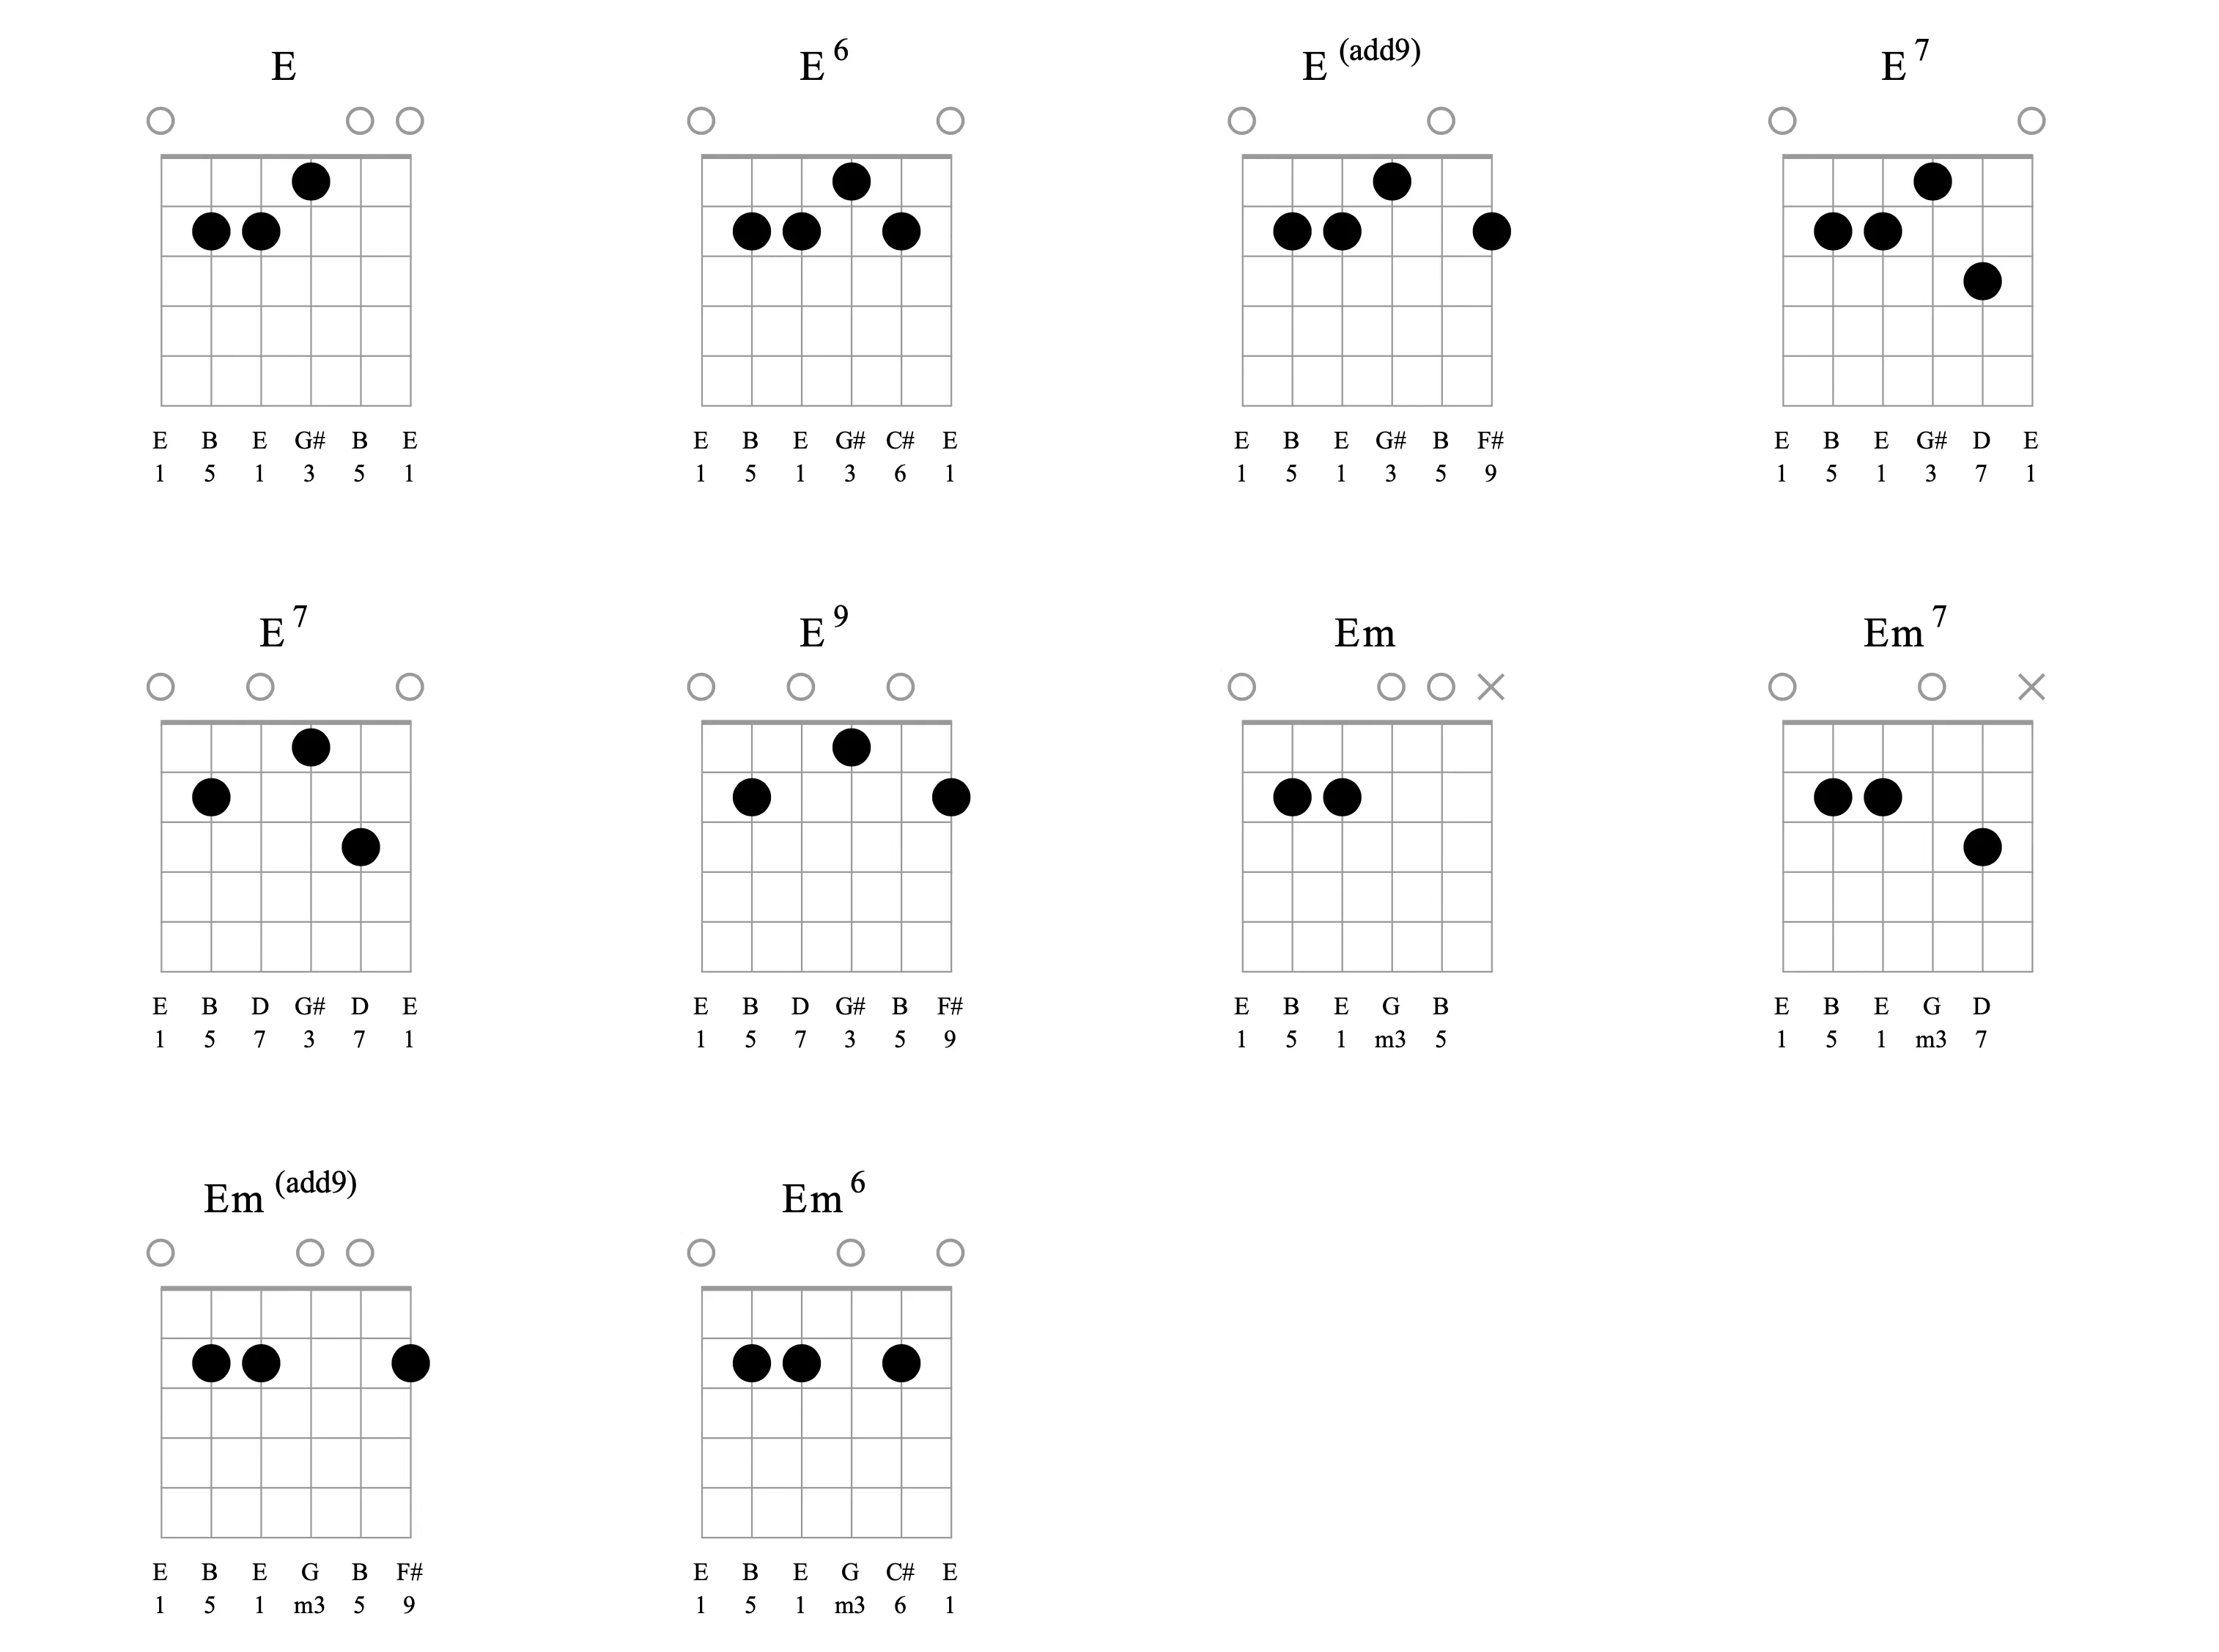
Another fantastic chord, with the low E on the bottom and the high E on the top and lots of simple augmentations. It’s why we guitar players love the key of E. So many things can be done by simply adding or removing a finger. If you’ve never done a hammer-on with your index, you’re missing out on a tried-and-true folk trick that gives that minor 3rd to major 3rd sound. Another tried-and-true trick is to let the D string ring, giving you a fuller E7. And of course, the pinky can be deployed to the B string to add 6ths and 7ths, or the high E string to add 2nds/9ths.